Samsung iDCS - Serial connection
These instructions help you configure your Samsung iDCS phone system to work with TIM Plus. Contact your system maintainer if you are not familiar with the configuration of your PBX.
Support files
Ensure the following support files exist in the /config/ folder of the TIM Plus application:
Samsung DCS.TDS
Samsung DCS.TDT
Contents
Configure the SMDR output
You may need to purchase a license to enable SMDR on this PBX. Please speak to your system maintainer if you are unsure.
Follow the instructions below to configure your Samsung iDCS to output SMDR data to TIM Plus.
- Log in to the Samsung Installation Tool software.
- Click on the 5. Features option from the left-hand menu.
- Click on the 5.6 System I/O Options tab and select 5.6.2. LAN Printer.
- In the LAN Printer options configure the entries in the SMDR column, as shown below:
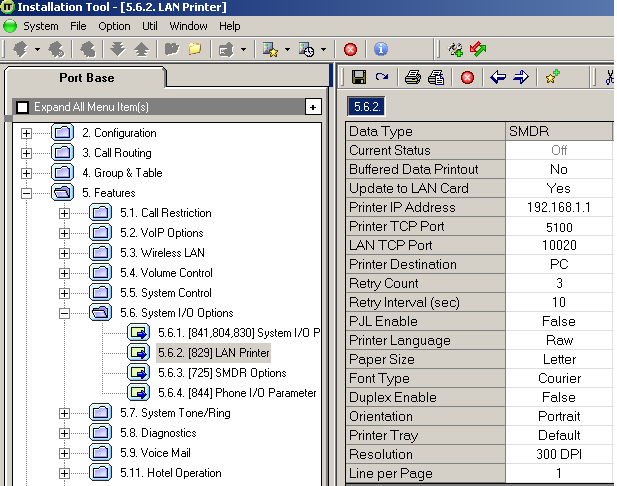
- Click on the Save icon to save the settings.
- Click on the 5.6.3. SMDR Options tab and configure the following settings:
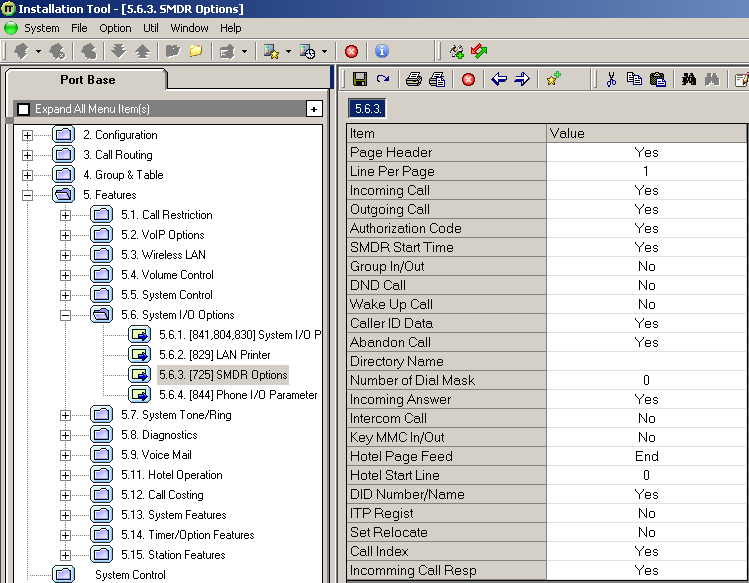
- Click on the Save icon at the top of the window to save the settings.
Installing NetPBX
The Samsung iDCS phone system can send its SMDR data via a serial connection. To collect the data from the serial port and send it to TIM Plus, you first need to install the NetPBX software. For setup instructions, click on the link below:
Install and configure NetPBX
Configure TIM Plus
Once NetPBX is configured and collecting data, log in to TIM Plus and perform the following steps:
- Click on the
Directorytab. - If you don't have a site set up, press
Addand selectPBXfrom the drop-down menu. In the dialogue window, name your site and then selectAdd. - Locate the site object you want to configure in the Directory, click on it and select
Properties.
- In the Site Properties window, select Samsung DCS from the PBX model drop-down list.
- In the Connection method field select No connection required from the drop-down list.
- Click on the
Savebutton to apply the settings.